I have debugged and resolved many difficult problems in many different types of systems, including massively complex computer processors, multi-threaded servers and apps, and troubled individuals, families, and organizations. The optimal procedure for finding and fixing bugs is essentially the same across all domains. Surprisingly, even software engineers do not always have a clear understanding of the process. I want to correct this now. This is my treatise on debugging.
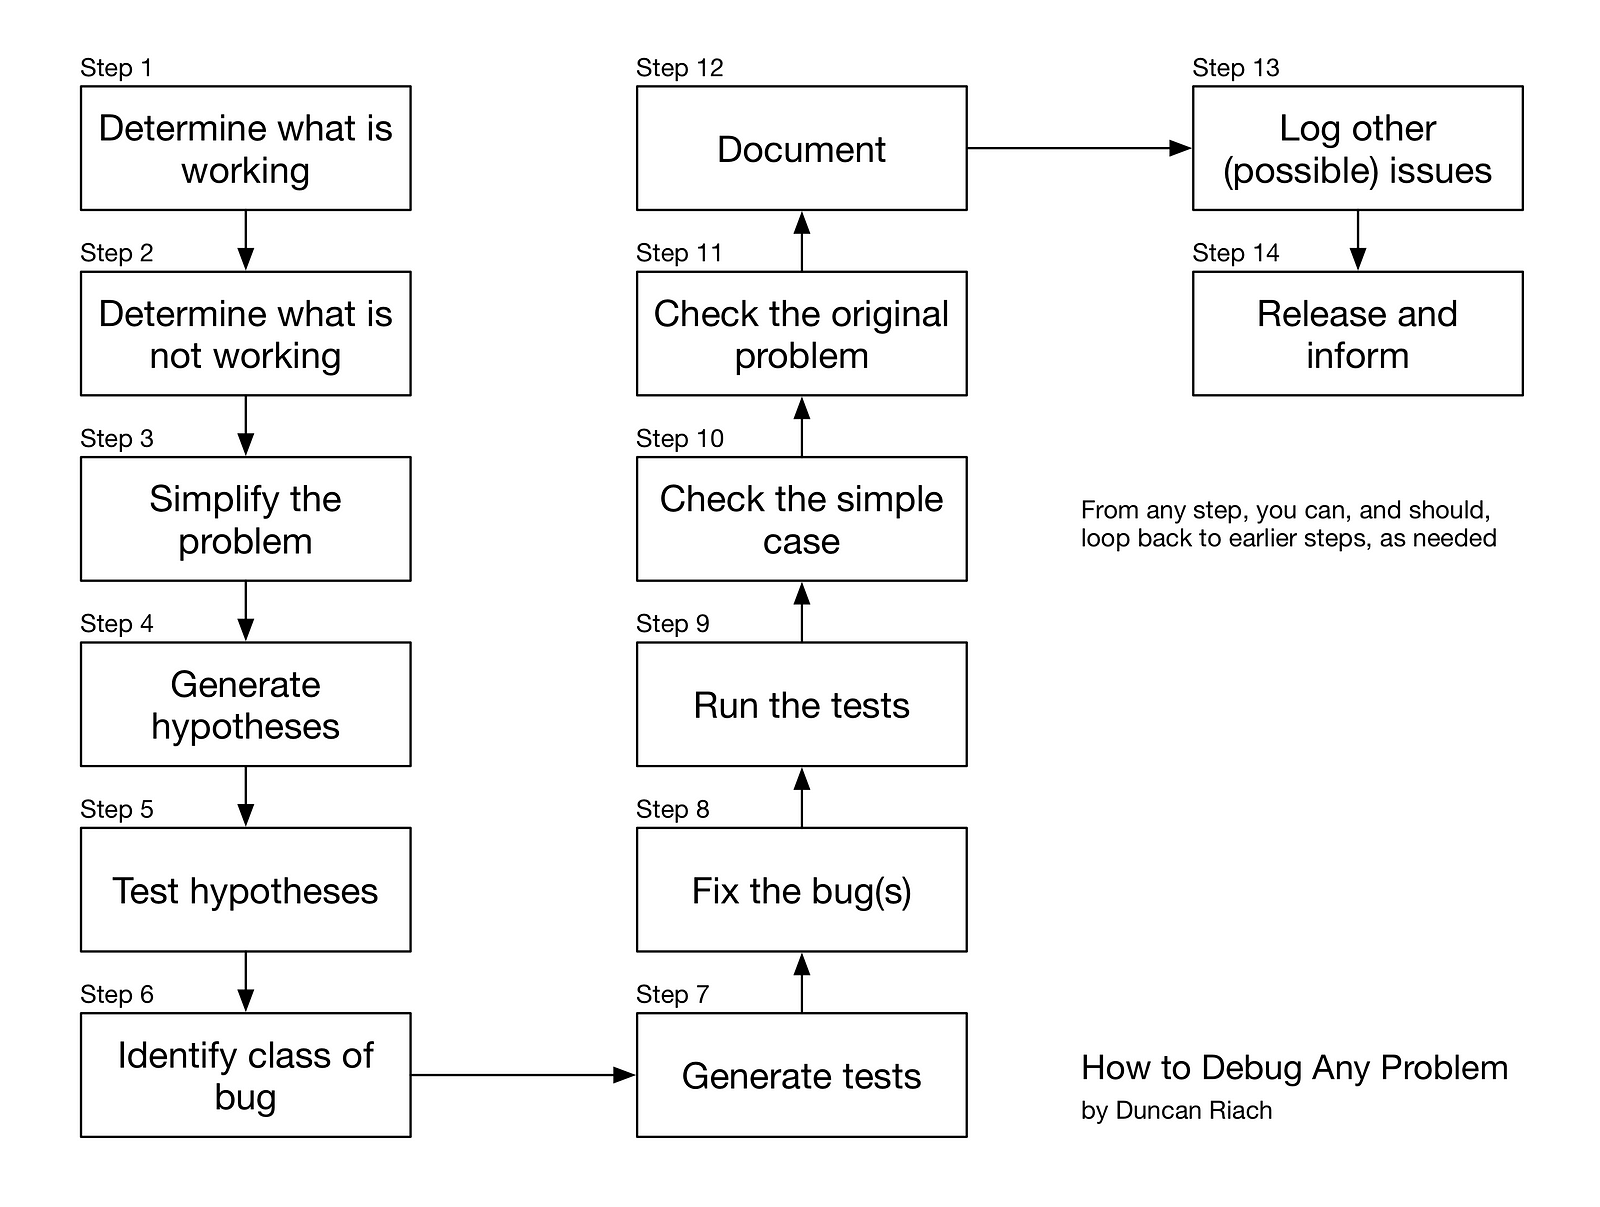
Step 1: Determine what is working
When something is not working as expected, it’s easy to assume that everything is broken. Take the time to find the things that are working in the realm of the problem. This will help to circumscribe the problem and create a clear picture in your mind of its edges.
Step 2: Determine precisely what is not working
In the process of determining what is working, you will catalog a set of operations or behaviors that do not work. Spend time fleshing-out this list. Be clear on precisely how the system is not working as expected. Even though it might seem like these first steps are pointless because the problem is “obvious,” often jumping into solving the problem too soon can lead to wasted time and effort, and to a partial or non-optimal solution.
Step 3: Simplify the problem
Problem behavior that is discovered in a complex situation can be hard to reproduce or generalize, especially when there are non-deterministic or statistical effects. Any attempt to simplify the test case whilst retaining the problematic behavior is always time well spent.
For example, if the problematic behavior occurs when processing a very large dataset, you may want to try to reproduce the problem with increasingly smaller datasets. Of course, this example would not be possible if the problem is related to large datasets. In that case, creating a simple though still large dataset might make more sense.
By incrementally paring-down the situation where the problem arises, you not only increase your clarity about precisely what does and doesn’t work, but you also naturally start to construct hypotheses about what might be causing the problem.
Simple test cases are useful to precisely communicate the bug with others, to quickly test whether changes affect the bug, and may also become part of your anti-regression tests (see step 7). Since simple test cases can usually be run quickly, they also support hypothesis testing (see step 5).
Step 4: Generate hypotheses
You might arrive at this point after minutes, hours, days, or even weeks of work. No matter how you got here, or how long it took, you will now have data, and you will have learned something about the way that the problem manifests. This knowledge enables you to form hypotheses about what might be causing the problem. These are theories about what process inside (or even outside) the system might be leading to the observed problematic behavior.
Step 5: Test hypotheses using divide and conquer
Taking each hypothesis in turn, dive into the system and find a place where you believe that something may be going wrong. Then run your small test case and look at the internal behavior first before and then after that point. If you find a problem before that point, then your hypothesis may have been wrong, and you at least know that you need to investigate further back towards the input of the system. If, on the other hand, the input to that part of the system seems correct, but the output seems incorrect, then you have support for your hypothesis, and you can go zoom-in more closely.
At this point, if the you are not fully clear on what the bug is, then loop back to step 1 on this identified sub-section of the system.
Note that it’s possible in this step to apply divide and conquer naively: split the system arbitrarily into two halves, look for a problem in each half, and then recursively zoom-in on the non-functional half. I don’t recommend this because it is usually a very slow and cumbersome process.
By using hypothesis-driven divide and conquer, it’s possible to save a lot of time and effort. You still go in and test whether behavior is as expected just before the sub-unit that is hypothesized to be broken, but then, if things are functional there, you go straight the output of that sub-unit.
Only proceed to step 6 once you’re clear about what the bugs is.
Step 6: Think of other versions of this class of bug
Sometimes bugs are caused by simple typos, or one-off misunderstandings, and these kinds of bugs can just be fixed in isolation. However, it’s much more common for bugs to be representative of a much larger class of problems.
After spending the time and effort to get to this step, you will usually have an incredibly clear perception of the relevant parts of the system and of the problem. You will be the world-class expert on this bug. For this reason, now is the time to leverage all of that knowledge. A week or a month from now, you will no longer have this clarity of perception with respect to this specific problem.
So spend time now to fully leverage your investment. Think about and document the overall class of bug, and determine if the system will likely manifest other expressions of the underlying issues, whether or not those particular expressions have been manifesting for users.
We don’t want to just stick a band-aid on a malignant tumor and send the patient home.
Step 7: Generate anti-regression tests
Even if you don’t design systems using test-driven development, I recommend that you use test-driven bug fixing.
Make sure to write unit level and/or system level tests that exercise as much of the bug class as possible. Make sure that the tests that you expect to fail do in fact fail. The main reason that the bug exists at all is because there are no tests that catch it. This means that there was a hole in the test suite. I often say that if something is not tested tested then it’s broken. This is because you have to assume that it’s either broken now or that it will get broken at some point in the future, and then the first person to discover it will be a customer.
Since you have a broken system right now, that it is broken by a bug of this class of bugs, now is a perfect opportunity to develop tests and ensure that they fail. These opportunities don’t arise all time, so grasp them while they are available.
I like to call regression tests anti-regression tests, because they prevent the product from regressing to an earlier, broken state. Run your test suite with all of your tests before releasing new revisions of your product.
Step 8: Fix the bug(s)
If you have been diligent up to this point, fixing the bugs is actually super-easy. It’s just a formality.
This kind of bug fixing can be performed very calmly and confidently. The fix is wrapped in a high-quality software engineering process, a process that informs and tests it. In contrast, I have witnessed engineers operating at the opposite end of the scale and just diving in and changing code in the hope that it will fix the overall problem. That kind of approach is more likely to introduce new bugs than to fix the existing ones.
While fixing the bugs, you might notice other problems. In that case, also loop back to an earlier step, such as step 6.
Step 9: Check that the tests now work
All the new tests should now work. If they don’t then you’ll need to loop back to an earlier step and resolve the issue.
Step 10: Check the original simple case
At this point, it should be possible to run the simple test cases that you developed in step 3, and they should be working properly. If not, then loop back to an earlier step to resolve the issue.
Step 11: Check the original issue
You should now be able to perform the behaviors originally reported to be problematic, and you should no longer see an issue. If you do see an issue, then return to an earlier step to resolve it.
Step 12: Documentation the fix
You have just performed an extremely high-quality set of engineering maneuvers. This is the stuff that legends are made of. It’s possible that you are the only person who is aware of your heroic actions. Write them down so that they can become a part of engineering lore. Document code, document the test-plan, document the test suite, write a wiki page or a blog post. Do something to capture the wisdom that you have developed and to make it available for others. Your documentation will also educate and mentor others. You will be setting a good example to other engineers, an example of both how to use resources effectively and efficiently, and also about how to go about challenging engineering work in a way that is deeply satisfying and nourishing to the soul.
Step 13: Note any other possible bug classes
During the time that you have been focusing your attention on resolving this particular issue, you may also have noticed other potential classes of bug, and also maybe other manifest classes of bug. File bug reports for issues that are manifest in dysfunctional behavior, or that you’re certain are lurking undetected. For other possible classes of bugs that may not be present but may also not currently be tested for, take whatever action is necessary to direct testing effort towards them. For example, you might update a test-plan ideas document.
Step 14: Release
Release your fix, either internally or externally, and make sure that everyone knows what you did. Summarize the problem and the solution succinctly, and include links to the documentation that you created.
Conclusion
You just did some awesome, high-quality engineering. Pat yourself on the back and head off to do something else that’s outstanding.

The post How to Debug Any Problem appeared first on Crypto Currency Online.
source https://cryptocurrencyonline.co/how-to-debug-any-problem/
No comments:
Post a Comment